Small Hands in the Big World

Showing posts with label Crafting. Show all posts

Tuesday, October 2, 2012

We've Moved

Please come see what we've been up to at the NEW (and hopefully vastly improved) Small Hands in the Big World site and tell me what you think. I'd love to hear your feedback.

The new site should load faster, be easier to search, and look better. What do you think? Was it worth the move from Blogger over to WordPress?

Learning WordPress has been much easier than I anticipated and I'm loving all the ways to customize my site. Uploading images doesn't don't seem to slow things down the way it did using Blogger and overall, WordPress appears to be a more sophisticated tool.

One disappointment was that importing my old posts hasn't been easy--they came out all garbled when I used the "automatic" import. However, I am transferring them over individually so everything will be in one place and you'll be able to easily search for projects or entries you may have enjoyed in the past.

Please come on over, take a look, and leave your comments. I love hearing from you and am so curious to get some feedback.

Thank you,
Liz Pin It

Saturday, April 28, 2012

Birthday Nature Crafts

Once the Forest Fairy and Animal party theme was approved by my Birthday Girl, fun ideas were abundant. Simple, affordable, and quick ideas, however, weren’t as easy to come up with. Enter Pinterest, a world of nothing but cool ideas to browse.

I need to thank the creative Mom of Paint Cut Paste who inspired these no-sew Forest Animal Masks using felt and glue.


All this mask-making took was a mix of colorful felt squares from Michael's (about 39 cents each), some thin black elastic, and fabric glue (I used all-purpose Tacky Glue). Superhero masks littering our playroom served as starting patterns to provide the perfect size and placement of eye holes. Next I hand-sketched  animal shapes around those masks onto paper, playing around with them until they looked right.
"Easy Peasy!" as the dear Birthday Girl would say. Sadly, I didn't get any photos of her in these masks that day...  she was too busy changing into different fairy princess costumes during the party. Oh well, at least it wasn't Hello Kitty.
Happy Birthday, Sweet Sara. I love you more than words can say.


Pin It

Thursday, January 12, 2012

Something New for the New Year

I only recently learned what a blog hop is and honestly, I'm still kind of figuring it out. So far, it's been a great way to find new projects and new blogs while inviting others to see what we've been up to here. I posted Sara's Fairy Princess Accessories but now it looks like my graphic link is broken. Oh well, I'm learning. Anyhow, take a look, hop around and have fun... Pin It

Saturday, December 24, 2011

Last Minute Costume Gift Making

Feeling guilty that there wasn’t a handmade gift under the tree for my boy, I went commando craft-o while Daddy took the kids out today.  Since last Halloween, William has wanted a S.W.A.T. team costume that he saw at our friends’ house (and has borrowed a couple times since). I decided to make him one of his own.

S.W.A.T Vest
The store bought costumes aren’t all that elaborate, just a black vest with SWAT written on it and usually some pockets and fasteners. Once again my strange abundance of crafting supplies came in handy. I used a large sheet of firm black felt for the front of the vest and a rectangle of soft black felt for the back (now it looks bulletproof from the front but it’ll still be soft and comfortable to wear). Trusty glue gun in hand, I turned it into an over-the-head vest with two strips of felt across the shoulders, attached a couple of felt pockets, some old badge clips, and modified an old black pocketbook that was just collecting dust in my closet. The change purse and interior slots for credit cards and a checkbook will be a great place for him to store a pen and pad of paper in case he needs to write someone a ticket. Old wires and broken chargers from cameras and cell phones were a nice touch too. I put one toward the top so he can pretend it’s some kind of headphone and clipped another one lower, to use like a radio. The finishing touch was a big S.W.A.T. painted across the top front. I used acrylic paint because that’s what I had on hand but fabric paint would have been better (letter stencils would have helped too but my boy won’t care that the letters aren’t perfect).

S.W.A.T Helmet
Grammy might recognize this when William opens it on Christmas morning… it’s actually from a set of plastic Kitchen Aid bowls she gave me a few years back. It’s so lightweight that it was never great for mixing but it does make a superb helmet. The smooth surface was a little harder to paint and I’m not thrilled with how it turned out but it’ll be a fun addition to the costume. Glue gunning on a weird plastic doodad from some kind of a container made a nice breathing mask in case the little pretender encounters any poison gases.


Bad-Guy Catching Cuffs (not pictured)
When searching for a box, I came across the lightweight cardboard “sleeve” supports that came with his last pair of Bogs boots and remembered with him playing with them when the boots were new. Starting with those as a frame, I wrote SWAT on each one and glue gunned on some black tech-y looking items left behind from broken toys, an old buckle from a car seat (the red button will look like something important, most likely some kind of weapon), and some weird bits we accumulated the last time we went to Creation Station up in Lynwood (more about that place on another day, it’s a great destination for inventive kids).


Follow up Note:  Click here to see how it all turned out Christmas Morning.
Pin It

Friday, December 23, 2011

Accessories Fit for a Fairy Princess


Discouraged by high prices for cheaply made princess paraphernalia and the insanely long line at the toy store, I decided to make some last minute handmade Christmas gifts for my girl. I’m no seamstress but I do have plenty of sparkly craft supplies on hand and I know how to wield a glue gun!


Crown
Digging in my various craft boxes, I was able to find supplies for a flower crown with flowing ribbons. Using two chenille pipe cleaners as a base, I connected them to one another, tied a long ribbon to one end (having previously measured it to leave long strips of ribbon at each end)then wrapped it around and around until it came to the other end at which I made another tie. Next came a string of pearl beads and I used the same technique, tying it at one end, wrapping it around and around then tying it off at the end. That actually looked pretty good but the perfect finishing touch was 5 little red ribbon roses. I glue-gunned those on and also used spots of glue to better secure the pearls. I will wait until Christmas morning to fit it perfectly to her head but it should be as easy as twisting ends together to make a custom Princess headpiece!

Shoes
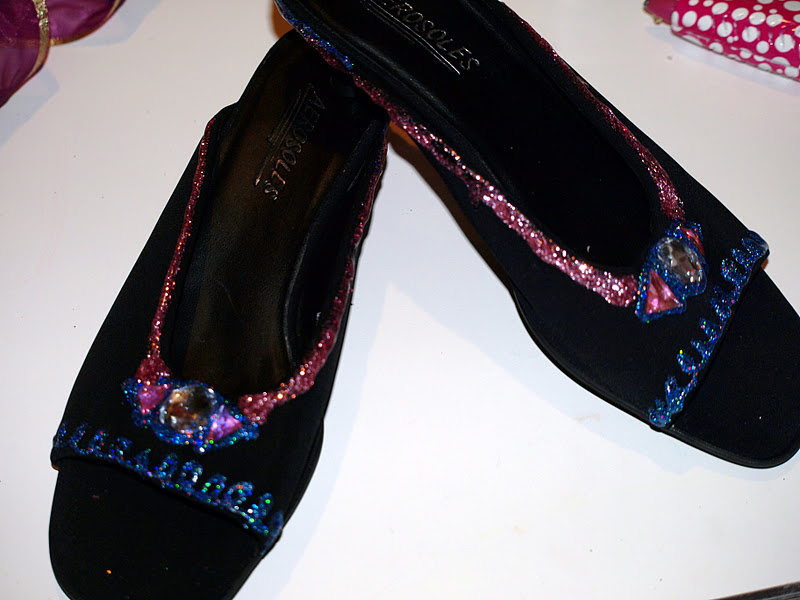
Do you have shoes in your closet that your kids always play with but you never wear? For me, it’s a few “clip clop shoes” with low heels that my kids love to thump thump thump around in. I’ve always worried that if I bought my daughter some of those little slightly high-heeled dress-up princess shoes, she’d want to wear them all the time. However, if my ridiculously-too-large-for-her clip clop shoes are her dress up shoes, it’s likely that she’ll only wear them for dress up… at least that’s what I’m hoping. I glue gunned on some faceted acrylic jewels and used glitter glue to make some one-of-a-kind fancy shoes.

Magic Wand
Glue-gunned onto a broken old wand, one of my handmade paper stars became a perfect topper for a elaborate new wand. Final touches included more strategically placed “jewels” and glitter glue.

Follow up note: Click here to see how it all turned out!
Pin It

Sunday, December 18, 2011

Handmade Holiday Gifts


Spoiler Alert! Grammy and Cuckoo Grandma (my two most faithful readers), stop reading right now if you want to be surprised on Christmas Morning! Your grand-elves and I have been busy crafting this past week.

Handmade often just ends up looking “homemade” or a kind person might say “quaint” when it comes from us. Thank goodness it’s the thought that counts… however, we did find a few things this year that turned out looking pretty darn nice if I do say so myself.

Glittery Pinecones: Loose glitter is something I've been avoiding for years. It always looks so fun and pretty when the kids have used it at preschool but the mess and knowing how glitter sticks to everything had me scared. Well, this is a simple and fun activity and they do turn out sparkly and luminous but at the risk of sounding Grinch-like, I have to say that my fear of glitter was justified. I'm still finding it everywhere. Next time I'll use large grain salt instead -- it looks frosty and pretty and the finished pinecones are not just decorative but also useful as fire starters in a wood stove or fireplace. 


Painted Picture Frames:  Michaels was selling these wonderfully simple unfinished wood frames for $1 each. I bought a dozen for us to use for holiday gifts and another dozen+ for William’s Kindergarten class to decorate on an upcoming art day (maybe we’ll make a Valentine’s Day gift using them). Providing a limited 3-color palette of acrylic paint colors to the kids and letting them loose on the frames resulted in some really fun gifts and they had a great time doing it.


Oil Pastel Artwork:  I could have put photos in the frames but since both lovely Grandmothers already have their homes wallpapered in pictures of the kids, we decided to make art. Oil Pastels were perfect since the frames have no glass and Pastels don’t need them. William had winter in mind with his Icicle image then ended up with an Orca whale on another one (I think he just draws then decides what it is at the end sometimes), and finally he drew a “really tough helicopter that doesn’t even need a person to fly it.” Sara copied the icicle idea in her mind for a couple Pastel pieces then I used a self-portrait that she did earlier this month for her last frame. I can’t get enough of her pictures of herself with wonderfully wild curls atop her head.

Homemade Granola:  One of our advent calendar activities was to make something for the kids’ teachers and bus drivers. Cookies are nice but while mine tend to taste great, they rarely look pretty enough for gift giving. This seemed like a more forgiving recipe to try and what doesn’t look cute in a fun little gingerbread bag? We made a vegan variation of Cynthia Lair’s Maple Butter Nut Granola using coconut oil instead of butter and omitting almonds (better to be safe than sorry with potential allergies). You’ll find her recipe and an accompanying video on her great website. By the way, another gift idea that I highly recommend for anyone interested in kid-friendly healthy whole food cuisine is Cynthia’s cookbook “Feeding the Whole Family.”  Darn, I should have thought of that sooner to give along with the granola. Oh well… maybe next year.


Paper Stars:  Best paper craft yet. I can’t stop making these. The finished product is so beautifully satisfying. Starting with pretty paper helps a lot (even better if it’s already cut into perfect squares for you to work with). I am a little embarrassed to admit how much scrapbooking paper I have in my closet. No, I’m not a scrapbook maker, I’m just a sucker whenever I find it at TJ Maxx for a super good price and I love pretty paper. Finally, now I have something to do with it! I found this idea over at Maya Made but must also give credit to this lovely website for posting such helpful instructions (please read both posts if you decide to do this craft, the tips in Maya’s post such as when to use glue stick versus Elmer’s glue are really helpful). My kindergarten boy was able to do the folding but got a bit frustrated when it came to the cutting and gluing part. My three year old had a harder time with folding but did great with the cutting and glue. These would make gorgeous gifts but sorry, the kids are hoarding them all in their rooms and want to keep them forever.

Costumes:  At the last minute, I got inspired to make Princess Accessories for my girl and a S.W.A.T. Team vest for my boy. They turned out to be the most beloved gifts of the holiday... Sara actually took her fairy wand to preschool this morning. Joy!
Pin It

Monday, December 12, 2011

Advent Adventures: Gingerbread House Play Date


Technically they aren’t gingerbread houses, they are actually made from graham crackers, but it’s the same idea. What is so great about this variation on the theme is that the kids not only have a chance to be creative with the candy decorations but they can also use their imagination to build whatever type of structures they want.
William's house with garage

Since there would be six kids making their own little scenes, I pre-made a LOT of graham cracker right angles. To do this, I mixed 1 cup water with 1 cup sugar and heated it to about 250 degrees, the point at which it will harden to a firm state when cooled. Next, I dipped two sides of graham cracker halves into the hot mixture and affixed them in a right angle then set them on a parchment lined cookie sheet to cool. I also made some right angles of one fourth of the graham cracker and left out plain crackers from the box so the kids would have more materials to work with. Ice cream sugar cones are another great addition to the construction mix. They make great trees (even when they break along the top, they can be broken into a smaller tree), chimneys, castle turrets, or ballroom dancing buildings (yep, that’s what William decided they were on one of his creations).
Admiring her park with a slide, climbing wall and skate ramp

Another good tip to prepare for a bunch of kids to work on these at the same time is providing cardboard or mat board to build on and preparing multiple bags of frosting for “glue.” (Recipe here.) Taping the back of the bag so the frosting is less likely to squish out onto small hands is also important (one squished out mess still happened despite my efforts – it helps to go around and “fix” each bag from time to time, pushing the frosting down as if it’s a tube of toothpaste).
This activity is even cool enough for Super Girl
...and easy enough for her little sister (almost 3) along with Spider Man's supervision

Once the young architects have built their creations, muffin tins are a great way to distribute all the candy and goodies they can use for decorating. Fill as many as you have so there is less reaching across the table which inevitably results in trees toppling as things get bumped.

Mostly candy filled our tins but it was fun to add some unexpected pretzels and bunny crackers too. One friend made a wreath using the pretzel and trails of bunnies all through the yard of his scene. The options are endless. Leave it to the kids to come up with some really cool ideas.
Pin It

Sunday, December 11, 2011

Advent Adventures: Homemade Wrapping Paper

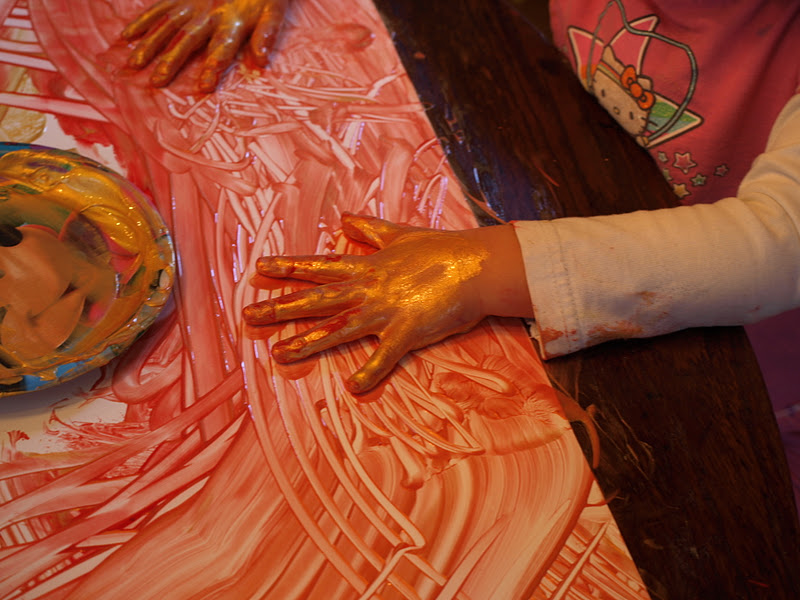
The idea is to dip cookie cutters in paint (we used BioColor Red and Colorations Metallic Gold Activity Paint) then transfer those shapes to your paper then Voila! Wrapping Paper. However, if you are three, you may prefer a more hands-on approach.

It all started out being fairly tame. Notice the nice shapes the cookie cutters leave behind...

Then the experiments began... William testing the "movement" of the paint on the plates and Sara started smearing

"Ooooooo, how 'bout I make a print, Mom?"

Happiness

All we need is to put a bow on her! Best present ever...
Pin It
Related Posts Plugin for WordPress, Blogger...